https://moveit.picknik.ai/main/doc/examples/move_group_interface/move_group_interface_tutorial.html#
Move Group C++ Interface — MoveIt Documentation: Rolling documentation
Move Group C++ Interface In MoveIt, the simplest user interface is through the MoveGroupInterface class. It provides easy to use functionality for most operations that a user may want to carry out, specifically setting joint or pose goals, creating motion
moveit.picknik.ai
Planning to a Pose goal
geometry_msgs::msg::Pose target_pose1;
target_pose1.orientation.w = 1.0;
target_pose1.position.x = 0.28;
target_pose1.position.y = -0.2;
target_pose1.position.z = 0.5;

move_group.setPoseTarget(target_pose1);
엔드 이펙터 (로봇팔의 끝, 여기서는 그리퍼) 위치를 설정해줌
moveit::planning_interface::MoveGroupInterface::Plan my_plan;

bool success = (move_group.plan(my_plan) == moveit::core::MoveItErrorCode::SUCCESS);

RCLCPP_INFO(LOGGER, "Visualizing plan 1 (pose goal) %s", success ? "" : "FAILED");
실제로 움직이지는 않고 경로를 계산
변수 success에 성공여부를 담는다.
//목표 자세를 축과 레이블로 표시
visual_tools.publishAxisLabeled(target_pose1, "pose1");
//Rviz에 텍스트 추가
 visual_tools.publishText(text_pose, "Pose_Goal", rvt::WHITE, rvt::XLARGE);
 //계획된 경로 선으로 표시
 visual_tools.publishTrajectoryLine(my_plan.trajectory, joint_model_group);
 //모든 마커 한번에 업데이트
 visual_tools.trigger();
 //다음 단계로 이동하라고 사용자에게 알림
 visual_tools.prompt("Press 'next' in the RvizVisualToolsGui window to continue the demo");
/* Uncomment below line when working with a real robot */
/* move_group.move(); */
Blocking 함수로 실제 로봇이 있고 컨트롤러가 활성화되어야 한다.
Blocking 함수는 작업 완료 전까지 프로그램의 실행 흐름이 멈춤
로봇 제어나 실시간 시스템처럼 연속적으로 데이터를 처리해야 하는 경우에는 Non-blocking 함수가 더 적합.
Planning to a joint-space goal
로봇의 각 관절(joint)의 각도를 목표로 설정하여 로봇을 제어하는 방식
moveit::core::RobotStatePtr current_state = move_group.getCurrentState(10);로봇의 현재 상태를 10ms 내에 가져온다 .
std::vector<double> joint_group_positions;
current_state->copyJointGroupPositions(joint_model_group, joint_group_positions);
joint_model_group : 해당그룹의 관절모델 참조
joint_group_positions : 로봇의 각 관절(joint)의 현재 위치(각도)를 저장하는 벡터
joint_group_positions[0] = -1.0;  // radians
bool within_bounds = move_group.setJointValueTarget(joint_group_positions);
첫번째 관절의 각도를 -1.0으로 설정(라디안 단위)
if (!within_bounds)
{
  RCLCPP_WARN(LOGGER, "Target joint position(s) were outside of limits, but we will plan and clamp to the limits ");
}
허용각도를 벗어났는지 안정성 확인
move_group.setMaxVelocityScalingFactor(0.05);
move_group.setMaxAccelerationScalingFactor(0.05);
속도, 가속도 설정
기본값은 10%
이러한 기본값은 joint_limits.yaml 파일에서 설정
후에 위와같이 모션화, 시각화 함
Planning with Path Constraints
OrientationConstraint는 로봇의 특정 링크가 움직이는 동안 지정된 방향(orientation)을 유지하도록 제한을 설정
복잡한 작업이나 제약된 특정 공간에서 사용하면 유용함
moveit_msgs::msg::OrientationConstraint ocm;
ocm.link_name = "panda_link7";  // 제한을 적용할 링크 이름
ocm.header.frame_id = "panda_link0";  // 기준이 되는 프레임
ocm.orientation.w = 1.0;  // 링크의 목표 쿼터니언 값 (여기선 단순히 특정 방향을 유지)

ocm.absolute_x_axis_tolerance = 0.1;  // x축 방향의 허용 오차
ocm.absolute_y_axis_tolerance = 0.1;  // y축 방향의 허용 오차
ocm.absolute_z_axis_tolerance = 0.1;  // z축 방향의 허용 오차
ocm.weight = 1.0;  // 이 제약 조건의 중요도 (1.0은 가장 중요)
moveit_msgs::msg::Constraints test_constraints;
test_constraints.orientation_constraints.push_back(ocm); // OrientationConstraint 추가
move_group.setPathConstraints(test_constraints); // 경로 제약 조건 설정
Enforce Planning in Joint Space
Cartesian Space: 로봇의 엔드 이펙터(끝 부분)가 3D 공간에서 움직이는 경로를 직접적으로 고려.
Joint Space: 로봇의 관절 각도를 기준으로 움직임을 계획.
Path Constraints
엔드 이펙터가 특정 방향이나 자세를 유지해야하는 경우 사용된다.
기본적으로 MoveIt은 IK(역운동학)를 사용해 Cartesian Space에서 표본을 생성.
Joint Space 강제 설정
enforce_joint_model_state_space: true로 설정 시 모든 계획이 Joint Space에서 수행됩니다. 이 경우 rejection sampling(유효하지 않은 표본은 버림)을 사용하여 적합한 표본을 찾습니다.
1.
// 현재 로봇 상태를 기반으로 새로운 상태 생성
moveit::core::RobotState start_state(*move_group.getCurrentState());

// 새로운 시작 포즈 정의
geometry_msgs::msg::Pose start_pose2;
start_pose2.orientation.w = 1.0;
start_pose2.position.x = 0.55;  // X 위치
start_pose2.position.y = -0.05; // Y 위치
start_pose2.position.z = 0.8;   // Z 위치

// Inverse Kinematics를 사용하여 Joint Model Group에 적합한 상태 설정
start_state.setFromIK(joint_model_group, start_pose2);

// MoveGroup에 시작 상태 설정
move_group.setStartState(start_state);
새로운 시작 위치를 설정한다.
* 여기서 아직 target_pose가 없는 역기구학을 왜 쓰는지?
시작포즈에 도달하기 위해서도 역기구학 필요
setFromIK() 함수는 주로 목표 포즈에 도달하기 위한 로봇의 시작 상태를 설정할 때 사용됨
이는 역기구학을 통해 로봇의 **관절 값(joint angles)**을 계산하여 로봇이 목표 포즈에 도달할 수 있는 초기 상태를 설정
* plan() 과 setFromIK()
- **setFromIK()**는 목표 포즈에 대해 로봇이 도달할 수 있는 관절 값을 계산하고, 이를 로봇의 시작 상태로 설정하는 데 사용됩니다. 즉, 목표에 도달할 수 있는 상태를 초기화하는 것입니다.
- **plan()**은 목표 포즈 또는 목표 관절 값을 설정한 후, 로봇이 그 목표에 도달하는 경로를 계획하고 생성하는 데 사용됩니다. 이 함수는 로봇의 경로를 계산하고, 이를 RViz에 시각화할 수 있도록 합니다.
둘다 역기구학 씀
2.
// 목표 포즈 설정
move_group.setPoseTarget(target_pose1);
3.
// 기본 5초에서 10초로 계획 시간을 증가
move_group.setPlanningTime(10.0);

// 계획 생성
success = (move_group.plan(my_plan) == moveit::core::MoveItErrorCode::SUCCESS);
RCLCPP_INFO(LOGGER, "Visualizing plan 3 (constraints) %s", success ? "" : "FAILED");
경로제약조건은 계산이 오래 걸려서 시간 조정 해야함.
4.
시각화후
5.
move_group.clearPathConstraints();경로제약조건 제거해야함
Cartesian Paths
엔드 이펙터가 여러 웨이포인트를 따라 이동하도록 카르테시안 경로(Cartesian Path)를 계획
카르테시안 경로 계획은 엔드 이펙터가 지나야 하는 위치들을 지정하고, 그 위치들을 따라 부드럽게 이동하는 경로를 생성.
1. 웨이포인트 정의
std::vector<geometry_msgs::msg::Pose> waypoints;
waypoints.push_back(start_pose2);  // 시작 포즈 추가 (초기 위치)

geometry_msgs::msg::Pose target_pose3 = start_pose2;  // 시작 포즈를 복사해서 수정

// target_pose3을 아래, 오른쪽, 그 후 위와 왼쪽으로 이동시킴
target_pose3.position.z -= 0.2;
waypoints.push_back(target_pose3);  // 아래로 이동

target_pose3.position.y -= 0.2;
waypoints.push_back(target_pose3);  // 오른쪽으로 이동

target_pose3.position.z += 0.2;
target_pose3.position.y += 0.2;
target_pose3.position.x -= 0.2;
waypoints.push_back(target_pose3);  // 위로 + 왼쪽으로 이동
2. 카르테시안 경로 계산
const double eef_step = 0.01;  // 엔드 이펙터가 한 번에 이동하는 최대 거리 (1cm)
moveit_msgs::msg::RobotTrajectory trajectory;
double fraction = move_group.computeCartesianPath(waypoints, eef_step, trajectory);
RCLCPP_INFO(LOGGER, "Visualizing plan 4 (Cartesian path) (%.2f%% achieved)", fraction * 100.0);
3. 시각화

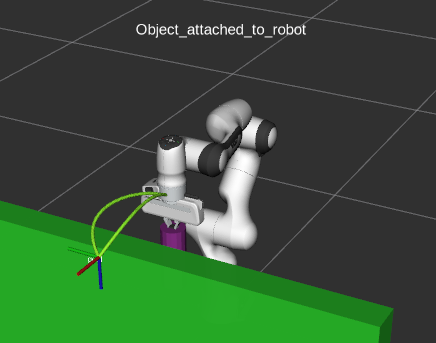
Attaching objects to the robot
로봇에 객체를 부착하고, 부착된 객체를 함께 움직이며 경로 계획
1. 부착할 객체 정의
moveit_msgs::msg::CollisionObject object_to_attach;
object_to_attach.id = "cylinder1";
shape_msgs::msg::SolidPrimitive cylinder_primitive;
cylinder_primitive.type = primitive.CYLINDER;
cylinder_primitive.dimensions.resize(2);
cylinder_primitive.dimensions[primitive.CYLINDER_HEIGHT] = 0.20;
cylinder_primitive.dimensions[primitive.CYLINDER_RADIUS] = 0.04;
2. 객체의 위치와 프레임 정의
object_to_attach.header.frame_id = move_group.getEndEffectorLink();
geometry_msgs::msg::Pose grab_pose;
grab_pose.orientation.w = 1.0;
grab_pose.position.z = 0.2;
frame_id 는 엔드 이펙터 링크로 z방향으로 0.2m 떨어진곳에 설정
3. 객체 월드에 추가
object_to_attach.primitives.push_back(cylinder_primitive);
object_to_attach.primitive_poses.push_back(grab_pose);
object_to_attach.operation = object_to_attach.ADD;
planning_scene_interface.applyCollisionObject(object_to_attach);
객체를 환경에 놓고 집을 수 있는 위치에 놓는다.
4. 객체를 로봇에 부착
RCLCPP_INFO(LOGGER, "Attach the object to the robot");
std::vector<std::string> touch_links;
//터치 링크를 정의하여, 그리퍼의 손가락과의 충돌을 허용
touch_links.push_back("panda_rightfinger");
touch_links.push_back("panda_leftfinger");
//객체가 로봇손에 부착되도록함 panda_hand는 객체가 부착될 로봇 링크
move_group.attachObject(object_to_attach.id, "panda_hand", touch_links);
5. 경로 계획후 시각화
move_group.setStartStateToCurrentState();
success = (move_group.plan(my_plan) == moveit::core::MoveItErrorCode::SUCCESS);
RCLCPP_INFO(LOGGER, "Visualizing plan 7 (move around cuboid with cylinder) %s", success ? "" : "FAILED");
visual_tools.publishTrajectoryLine(my_plan.trajectory, joint_model_group);
visual_tools.trigger();
visual_tools.prompt("Press 'next' in the RvizVisualToolsGui window once the plan is complete");